Here are steps to configure and create a user account on Database by using Scripted JDBC resource adapter.
Step 1#
Make Scripted JDBC Resource available to IdM resource list after selecting the 'Configure Manager Resources' from 'Resource Type Actions' tab under Resource section.

Step 2 #
Create a Database Table 'users'.

Step 3 #
Before adding Scripted JDBC resource in IdM let's first create Resource Actions which will actually Create , Update and Delete a user record on Scripted JDBC resource.
To create Resource Actions just follow the conventions of either BeanShell or JavaScript (Rhino) which is located at following directory
WS_HOME\idm\sample\ScriptedJdbc\SimpleTable\beanshell
I have modified following Resource Actions just to create a new account on Scripted JDBC resource
1.SimpleTable-createUser-bsh.xml
2.SimpleTable-getUser-bsh.xml
Note: GetUser Resource Action is required to implement for Scripted JDBC Resource Adapter to work properly.
Here is my version of Create and GetUSer Resource Action
Demo-createUser-bsh
import java.sql.PreparedStatement;
/*
* First define helper methods
*/
void flushResults(PreparedStatement st) {
try {
int result = 1;
boolean more = true;
while (more) {
// what did we get?
int rowCount = st.getUpdateCount();
if (rowCount >= 0) {
// this result is an update count
// println("Result " + Util.itoa(result) +
// " update count " + Util.itoa(rowCount));
} else {
// not an update count
ResultSet rs = st.getResultSet();
if (rs != null) {
rs.close();
} else {
// no more
more = false;
}
}
// with Oracle driver...
if (more)
more = st.getMoreResults();
result++;
}
}
catch (Throwable t) {
t.printStackTrace();
throw t;
}
}
// START HERE
id = actionContext.get("id");
conn = actionContext.get("conn");
action = actionContext.get("action");
errors = actionContext.get("errors");
trace = actionContext.get("trace");
password = actionContext.get("password");
attrs = actionContext.get("attributes");
StringBuffer sqlCmdBuf = new StringBuffer();
sqlCmdBuf.append("INSERT INTO users ");
sqlCmdBuf.append("(accountId,password,firstname,lastname,email)");
sqlCmdBuf.append("VALUES(?,?,?,?,?)");
String sql = sqlCmdBuf.toString();
PreparedStatement s = null;
try {
s = conn.prepareStatement(sql);
s.setString(1, id);
s.setString(2, password);
s.setString(3, attrs.get("firstname"));
s.setString(4, attrs.get("lastname"));
s.setString(5, attrs.get("email"));
s.execute();
flushResults(s);
} finally {
if (s != null)
s.close();
}
Demo-getUser-bsh
import java.sql.ResultSet;
import java.sql.PreparedStatement;
id = actionContext.get("id");
conn = actionContext.get("conn");
action = actionContext.get("action");
errors = actionContext.get("errors");
trace = actionContext.get("trace");
result = actionContext.get("result");
StringBuffer sqlCmdBuf = new StringBuffer();
sqlCmdBuf.append("SELECT firstname,lastname,email FROM users");
sqlCmdBuf.append(" where accountId = ?");
String sql = sqlCmdBuf.toString();
PreparedStatement st = null;
ResultSet res = null;
try {
st = conn.prepareStatement(sql);
st.setString(1, id);
res = st.executeQuery();
if ( res.next() ) {
// Populate attrMap with the queried user attributes
java.util.Map attrMap = new java.util.Hashtable();
String firstname = res.getString("firstname");
if (firstname != null) { attrMap.put("firstname", firstname); }
String lastname = res.getString("lastname");
if (lastname != null) { attrMap.put("lastname", lastname); }
String email = res.getString("email");
if (email != null) { attrMap.put("email", email); }
// Put the attrMap into the result
result.put("attrMap", attrMap);
}
} finally {
if (res != null)
res.close();
if (st != null)
st.close();
}
Step 4#
Now add Scripted JDBC Resource in IdM and configure the schema mapping for user account attributes

Step 4.2# Configure MySQL database table.

Step 4.3# Map customized Resource Action for Get User and Create User action

Step 4.4# Resource Schema Mapping

Step 4.5#
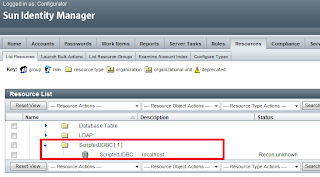
Finally, Scripted JDBC Resource appears in the Resource List to manage user accounts.
Step 5#. Create New User Account on Scripted JDBC Resource
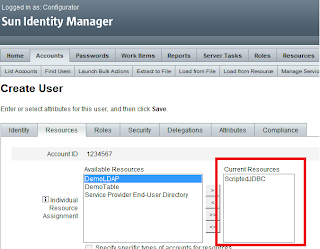
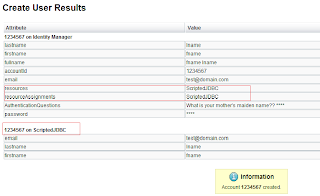

Step 5#. Create New User Account on Scripted JDBC Resource


We can add our own customized Resource Actions to perform Database related operations.
Use the following URL to get more information about Scripted JDBC Resource Adapter
http://docs.sun.com/app/docs/doc/820-6551/giivs?a=view
